 how-to
Signs of Cogged Belt Wear and Tear
Last Updated: October 26, 2026
Quick Summary
Cogged belt wear is a sequence of material changes that leaves distinct visual signatures: glazing and polish on rib flanks, surface cracking at the rib base, rib flattening, rubber hardening, cord exposure and fraying, and finally rib separation or chunk-out. Reading these signatures lets you catch a belt at the plan replacement stage instead of failure.
- Glazing means the belt is slipping microscopically and generating extra heat, though it still works.
- Hairline cracks appear first at the rib base under raking light and run across the rib, not along it.
- Hardened rubber that cracks when bent cannot conform to the groove and will slip even at correct tension.
- Exposed, broken, or frayed tensile cords at the edge mean lost structural capacity and require immediate replacement.
- Replace belts with cracks across multiple ribs, chunk-out, exposed cords, or heat damage before they fail in service.
Table of Contents
- What Cogged Belt Wear Looks Like
- Common Causes of Cogged Belt Wear
- How to Inspect a V-Belt for Damage
- Pulley Misalignment and Belt Deterioration
- When to Replace a V-Belt
- Choosing the Correct Cogged Belt Replacement Size
- Getting the Right Replacement Belt for Your Equipment
- Frequently Asked Questions
What Cogged Belt Wear Looks Like
Cogged belt wear is rarely a single event. It is a sequence of material changes that follow a predictable order, each leaving a distinct visual signature. Reading those signatures lets you catch a belt at the "plan replacement" stage instead of the "production stopped" stage.
The wear progression, in order
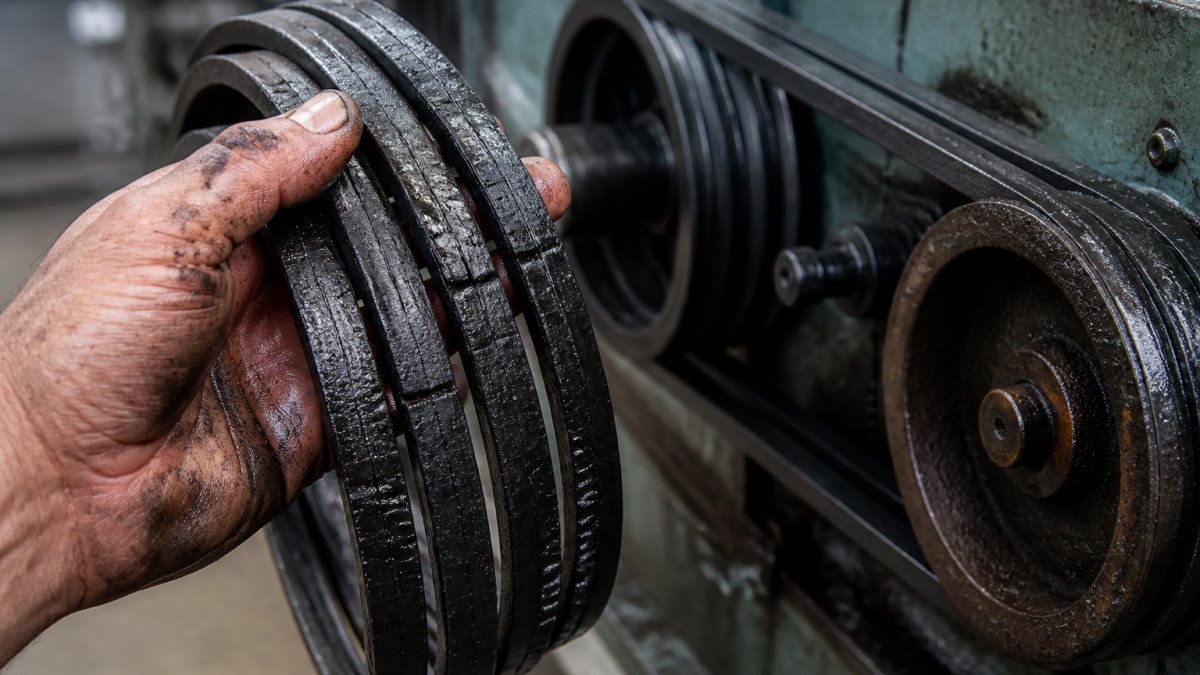
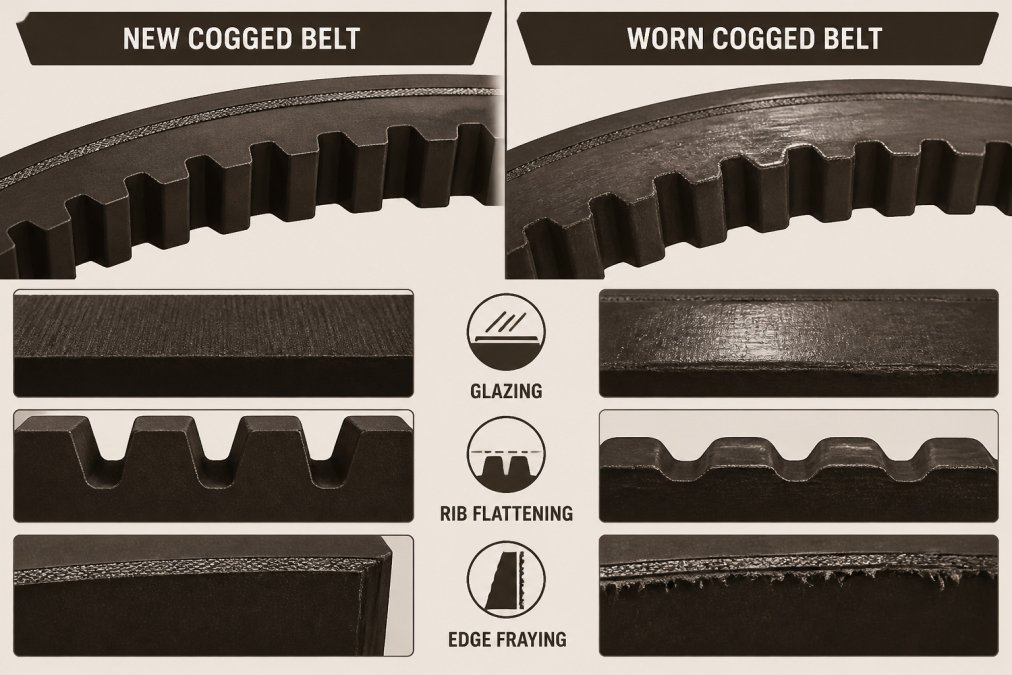
1. Glazing and polish. The rib flanks take on a glossy, mirror-like sheen where they contact the pulley groove.
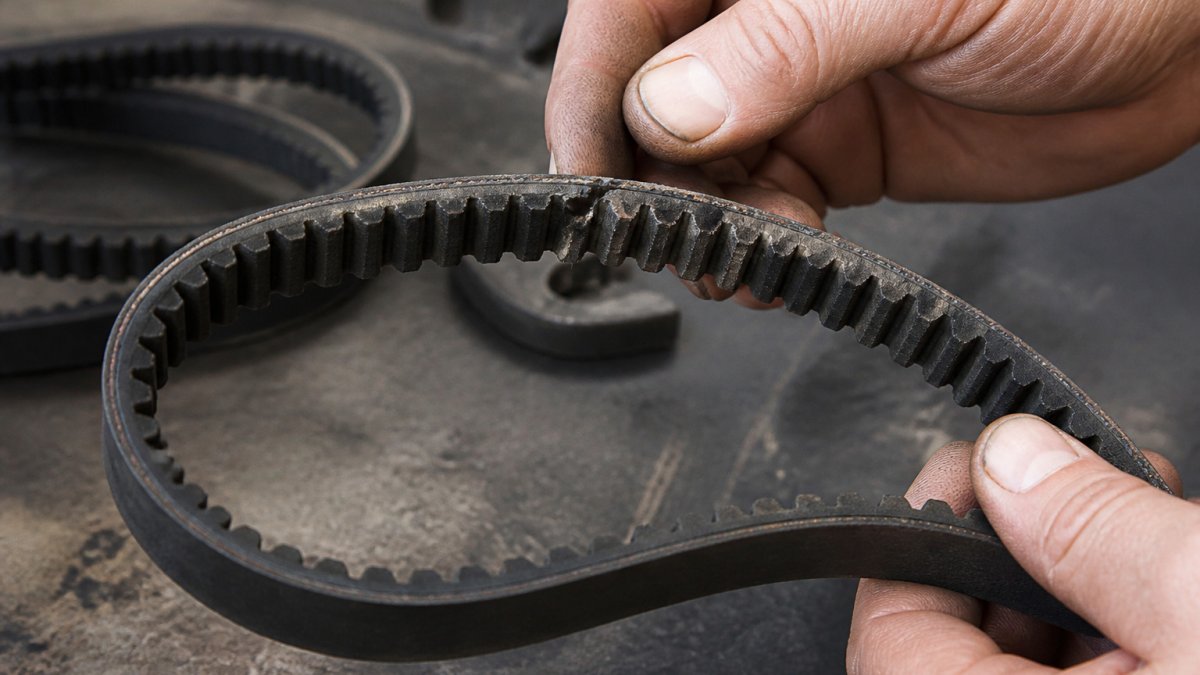
2. Surface cracking. Cracks appear first at the base of the ribs, where flex stress concentrates. Early cracks are hairline and run across the rib, not along it.
3. Rib undercutting and flattening. As rib tips wear, they lose their trapezoidal profile and become flat-topped, contacting the groove over a smaller area, which raises unit pressure and accelerates wear.
4. Hardening and embrittlement. Heat-cycled rubber loses plasticizer and stiffens. Pinch the belt: fresh rubber flexes and recovers; aged rubber feels like hard plastic and may crack when bent.
5. Edge cord exposure and fraying. Tensile cords (polyester, aramid, or fiberglass) sit near the neutral axis. When the edge frays or turns fuzzy, the cords are being abraded against the pulley flange.
6. Rib separation and chunk-out. In the final stage, rubber tears from the rib root or whole teeth shear off. This is a failure, not a wear symptom.
Material-specific patterns
Different belt constructions fail differently:
- Rubber (neoprene/EPDM) cogged belts crack and glaze first; heat damage shows as brown or black patches.
- Polyurethane cogged belts resist abrasion but develop a "chalking" white haze before cracking, and are more sensitive to hydrolysis in humid or washdown environments.
- Aramid-reinforced belts resist stretch and heat better than polyester, but their cords break cleanly rather than fray, so edges may look normal right up until sudden failure. Inspect aramid belts more often if they run hot.
Normal vs. worn: a quick visual reference
| Feature | Normal | Worn |
|---|---|---|
| Rib profile | Crisp, uniform trapezoids | Rounded, flat-topped, or undercut |
| Rib surface | Matte, even color | Glossy, glazed, or patchy discoloration |
| Cracks | None | Hairline cracks at rib root, growing across the rib |
| Edges | Smooth, no fuzz | Frayed, fuzzy, cords visible |
| Flex | Supple, springs back | Stiff, cracks when bent |
| Noise | Quiet | Squeal, chirp, or rattle |
What is not wear
Some marks look alarming but are benign: mold-release residue on a new belt, a faint manufacturing seam line, and light dust from a dry environment. Do not replace a belt for these. What matters is changes in profile, stiffness, and cord condition, not surface color alone.
Common Causes of Cogged Belt Wear
Most belt wear comes from preventable operating problems.
Improper tension is the leading cause. Too tight strains the belt under load; too loose makes it slip. Either way it fails faster, and many teams guess at tension instead of measuring it.
Pulley misalignment destroys belts quickly. When sheaves aren't parallel, the belt tracks to one side, creating uneven rib pressure and faster wear on one edge.
Contamination speeds deterioration. Oil, dirt, and debris stick to the belt, break down the rubber, and reduce grip, forcing slip, heat, and friction.
Environmental factors matter more than most realize. Heat softens rubber, cold makes it brittle, UV hardens it, and moisture causes swelling and separation.
Excessive load causes premature failure. A belt carrying more power than rated shears its ribs or wears teeth flat, creating vibration and noise.
Poor maintenance habits accelerate wear. Running past service life, ignoring warning signs, or skipping inspections all lead to failure, a belt that could last years fails in months.
How to Inspect a V-Belt for Damage
Start with the engine off and the system depressurized. Never inspect a running belt.
Step 1: Visual scan Rotate the pulley by hand and check the entire belt surface for cracks, separation, discoloration, and shiny or glazed areas.
Step 2: Check the ribs Run your finger across the rib teeth. They should feel uniform and firm.
Step 3: Feel for hardness Pinch the belt. Fresh rubber flexes easily; hard, brittle material means an aged belt that will fail soon.
Step 4: Inspect the edges Look where the ribs meet the belt body. Separation or fraying here indicates structural failure. The belt can't hold tension.
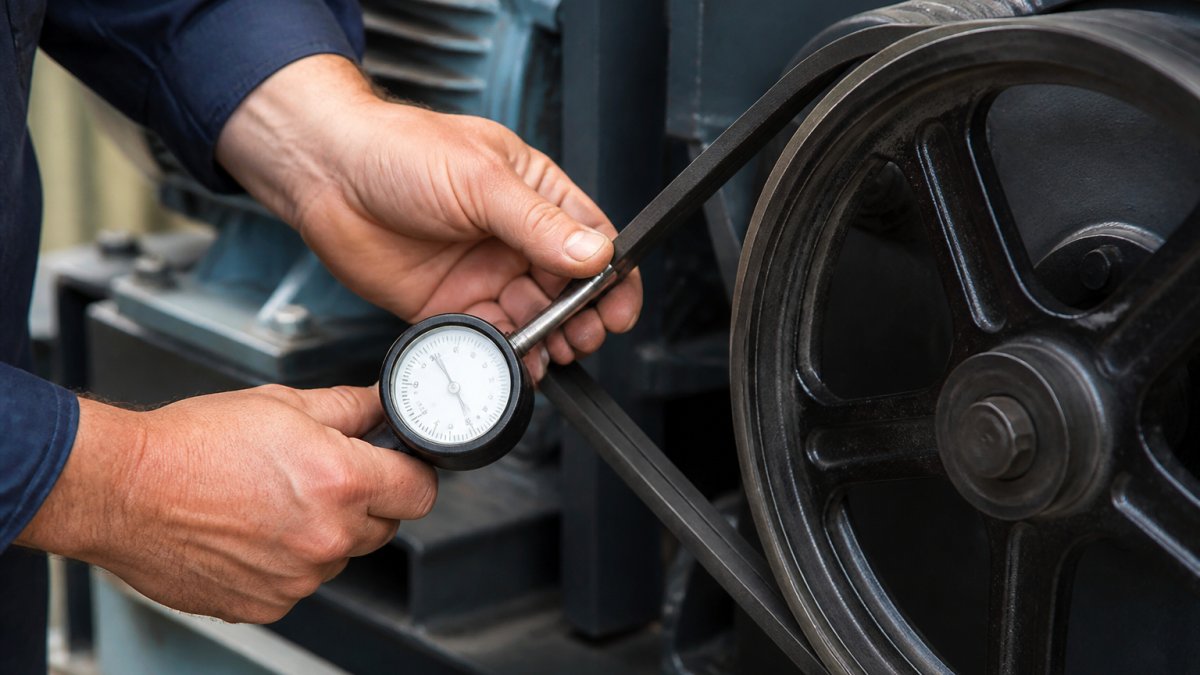
Step 5: Test belt tension Lay a straightedge across the pulley and press the belt midway between pulleys. Most applications should deflect about 1/2 inch.
Step 6: Listen for noise A healthy belt runs quietly. Squealing means slippage; chirping or rattling suggests misalignment or worn ribs; grinding indicates contamination or debris.
Step 7: Check for vibration Feel the belt housing while the system runs. Excessive vibration points to misalignment or imbalance, and the belt may be tracking off-center.
Pulley Misalignment and Belt Deterioration
Misaligned pulleys are one of the fastest ways to destroy a belt. When sheaves aren't parallel, the belt can't track straight.
The belt rides to one side of the pulley. This creates flank wear on the belt edges. The ribs wear unevenly. One side gets damaged while the other looks fine.
Over time, the belt edges fray and separate. The reinforcing cords inside get exposed. The belt loses structural strength and fails.
Misalignment also causes belt deflection problems. The belt doesn't sit centered in the groove. It contacts the pulley flanges, rubbing and heating up. This accelerates deterioration.
You can diagnose misalignment by watching the belt run. It should track straight down the middle of the pulley. If it wanders or rides to one side, the sheaves are out of alignment.
Use a laser alignment tool for precision. Many shops skip this step and pay for it in belt replacements. Proper alignment extends belt life significantly.
Learn more about when replacing pulleys makes sense compared to belt replacement. Understanding this relationship helps you make the right maintenance decision.
When to Replace a V-Belt
Replacement timing is a decision, not a guess. The goal is to replace on a planned basis, before failure, while avoiding premature swaps that waste money. Use the criteria below to sort a belt into one of three buckets.
Bucket 1: Replace now (do not run)
Pull the belt from service if any of these are present:
- Cracks that run across multiple ribs, or any crack that reaches the cord line
- Rib chunk-out, undercutting, or teeth sheared off
- Exposed, broken, or whiskering tensile cords at the edge
- Hardened rubber that cracks when flexed by hand
- Heat damage: brown/black patches, or a burnt-rubber smell
- Slippage that persists after tension is set to specification
- Visible belt tracking off-center on the pulley after alignment is confirmed
Bucket 2: Schedule replacement at the next downtime window
These are early-warning signs. The belt is still serviceable but is on the wear curve:
- Glazing or polish on the rib flanks
- Hairline cracks at the rib root on one or two ribs
- Light edge fuzz with no visible cord
- Occasional start-up squeal that disappears once running
- Measurable rib flattening (rib tip visibly wider than a new belt)
Bucket 3: Monitor at the next inspection
- Faint surface discoloration with no cracking
- Normal mold-release residue or seam lines
- Slight dust accumulation that wipes off
Set a replacement interval from data, not a calendar
"Three to five years" is a common rule of thumb, but it is a poor planning tool because duty cycle dominates. A belt on a lightly loaded HVAC fan may run a decade; the same belt on a crusher or a high-cycle compressor may fail in under a year. Build your interval from three inputs:
- Manufacturer service life for the specific belt construction (rubber vs. polyurethane vs. aramid).
- Your own inspection history, how many hours until the first glazing or cracking appeared?
- Consequence of failure, a belt that stops a production line justifies a shorter interval than one on a redundant fan.
A simple inspection schedule you can adopt
| Frequency | Check | Pass criteria |
|---|---|---|
| Weekly (visual, running) | Noise, vibration, tracking | Quiet, smooth, centered |
| Monthly (power off) | Glazing, cracks, edge fuzz | No cracks; edges smooth |
| Quarterly | Tension and deflection | Within manufacturer spec (commonly ~1/64 in per inch of span) |
| Semi-annual | Rib profile, hardness, cord condition | Crisp ribs; supple rubber; no exposed cord |
| Annually | Pulley alignment and groove wear | Sheaves parallel; grooves not hooked or worn |
The cost of waiting
A belt that fails in service does more than stop the machine. It can wrap around a shaft, damage the pulley, take out a bearing, or create a safety hazard. When the inspection data is ambiguous, consult the equipment manufacturer's guidance.
Belt tension and deflection measurement guidance
Choosing the Correct Cogged Belt Replacement Size
Getting the right size matters. A belt that's too small won't fit. Too large, and it won't grip the pulley properly.
Measure the belt pitch. This is the distance between rib centers. Common pitches include 3V, 5V, and 8V. The pitch determines which pulley grooves the belt fits into.
Measure the belt length. This is the circumference around the pulleys. Most belts are measured in inches. A 8VX2000 belt, for example, has 8mm pitch and 2000mm length.
Check your equipment manual for the exact specification. The model number usually includes belt size. Write it down and keep it handy.
Don't estimate. A belt that's 1 inch too long won't work. One that's too short won't reach across the pulleys. Measure twice, order once.
Count the ribs if you're unsure of the pitch. Cogged belts have distinct rib patterns. 3V belts have smaller ribs. 5V and 8V belts have larger, more prominent ribs.
Browse the 6 8vx2000 cogged banded wedge belt option and other replacement sizes to find the exact fit for your equipment.
Getting the Right Replacement Belt for Your Equipment
Once you know the size, V-Belt Nation offers cogged belt options.
Our selection includes industrial V-belts and lawn and garden options.
We offer free ground shipping on all U.S. orders over $175.
Our Price Match Guarantee supports competitive pricing. Our team can help you find the size and type you need.
Contact us for help finding a specific belt. If you need cogged belt replacements, our team can help you find an option.
Frequently Asked Questions
What does a worn cogged belt look like?
A worn cogged belt may show visible cracking along the ribs, separation between the ribs and backing, fraying edges, hardened or glazed flanks, and discoloration. The ribs may appear flattened or show uneven wear patterns. Chunks of rubber may be missing from the teeth, and the belt may have a brittle texture.
Why is my cogged belt cracking?
Cogged belt cracking may be associated with heat, tension, pulley alignment, age, or environmental exposure. Consult the belt and equipment manufacturers' guidance when investigating possible causes.
How do I know when to replace a V-belt?
Visible cracking, rib separation, edge cord damage, persistent squealing, slippage, or hardened and glazed flanks are signs to assess when considering V-belt replacement. Consult the equipment and belt manufacturers' guidance for inspection and replacement intervals.
How do I choose the correct cogged belt replacement size?
Check the belt's size marking and cross-reference it with your equipment manual or original belt documentation. If the marking is worn away, consult your machinery manual or contact the manufacturer. V-Belt Nation's support team can help you find a specific belt.
Machinery downtime costs money. A worn cogged belt is a predictable failure. Regular inspection catches problems early. Proper tension and alignment extend belt life. When replacement time comes, having the right size on hand prevents delays. V-Belt Nation makes it easy to stock the belts you need, with competitive pricing and fast delivery to keep your equipment running.